Smart
Email intake.
Step 4 - AI Builder category classification custom
model
Smart Email intake.
Step 4 - AI Builder category classification custom
model
The volume of text data is increasing exponentially for organizations. Channels such as email, documents, and social media contribute increasing amounts of text data. This data carries valuable information that—when extracted and acted on—helps you provide better services to your customers.
Now we can build custom AI models to analyze customer intent and context using Power AI Builder category classification custom models. We want to support multi languages and there are two approaches to consider:
- Use one common language model – In this case you need to translate all emails into the common language, for example English and use the translated content for the classification models.
- Use for each language dedicated models – In this case you need to establish for each supported language a dedicated and trained model.
Booth approaches has their advantages and disadvantages
| Comparison | Common Model | Dedicated Models |
|---|---|---|
| Advantages |
Supports any languages Simplifies the maintenance to train and retrain the model |
Higher accuracy to identify customer intent. |
| Disadvantages | Lower accuracy to identify customer intent. Some terms/sentence are vey specific to the language | Higher maintenance to train and retrain the models |
Prerequisites
- This model requires the training data to be available within a Dataverse table. In our case we’ll use Cases and have loaded some test data.
- Make sure your administrator has assigned you a security role with Read privilege for the table that has the training data.
Data preparation
The training data used to train the model from the Dataverse table should conform to the following:
- Store text and tags as two columns in the same table. Each row must have data in the Text column.
- You can provide one or more tags to data in the same row in the Text column.
- If you've identified multiple tags within the text sample, provide them as delimited text in the Tags fields. We use semicolons (;) as tag separators. For example:
- Make sure to have a minimum of 10 distinct text samples for each tag to be extracted. Tags with fewer than 10 samples won't be trained.
- If Cases has been tagged in fewer than 10 rows in the data, it will be ignored. The model won't be trained to categorize data for that tag.
- For every tag that is used, provide a minimum of 10 text samples where it isn't used.
| Description | Category Tags |
|---|---|
|
Please make the following resignation. Contract 0DB78F AHV numbers 756.9950.7311.96 Hansrudolf MusterObere Musterstrasse 18b 8000 Zurich |
Pension fund; Withdrawal; |
|
Hello Unfortunately, I had an accident and have a question about it. My vehicle AI3214. Can you clarify how high my deductible is? Many thanks for the prompt clarification Best regards,Marc Brühlhard Bahnofstrasse 13 |
Vehicle Insurance; Deductible; |
Steps to prepare sample data
- In our case we can send Email with sample text to support@ursruegg.com and the automatically create records rule creates for each Email a new case.
- Prepare and send at least 10 Emails with sample data
- Open “Customer Service Hub” and select cases.
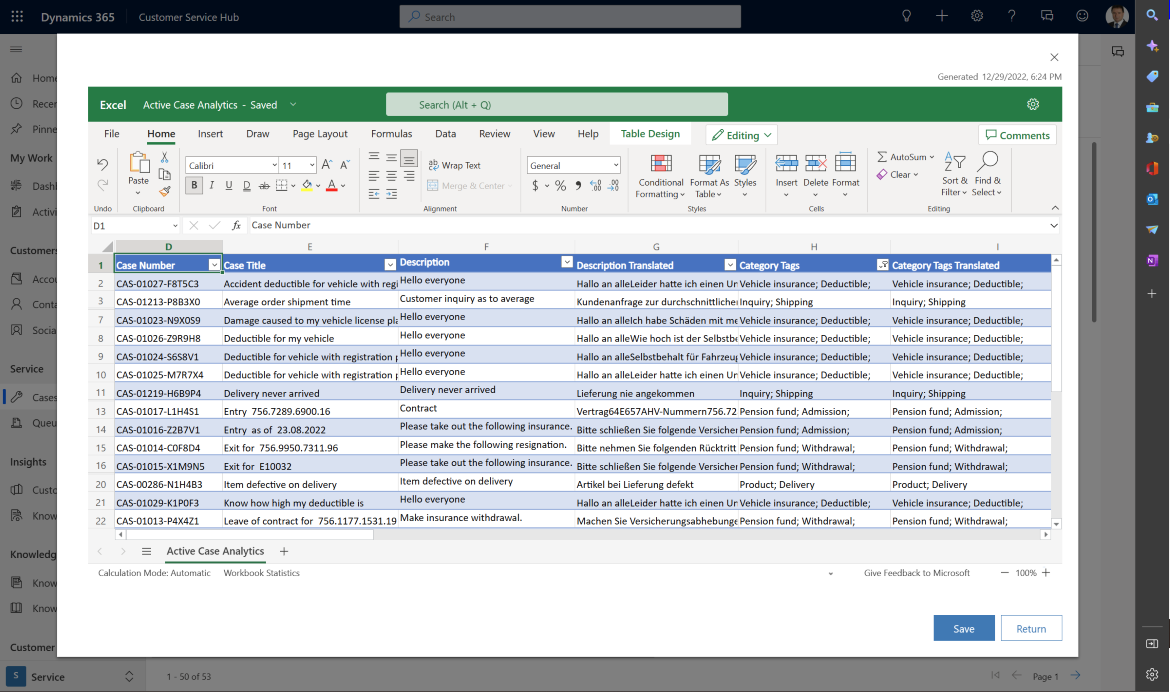
- Open the view “Active Case Analytics” and check if the cases with the sample data is there.
- Select “Export to Excel” – “Open in Excel Online”
- Update the Category Tag for each case. In our case we defined the following tags based products and customer intent
- Pension fund; Withdrawal; Admission; Wage change;
- Vehicle Insurance; Deductible;
- Select “Save” and the updated cases including the category tags will be imported
- Go back to the view “Active Case Analytics” and check if the category tags are updated
 Case
Management
Update the Category Tag
for each case. In our case we defined the following tags
based products and customer intent.
Case
Management
Update the Category Tag
for each case. In our case we defined the following tags
based products and customer intent.
Keep in mind
- A table must have at least two tags, and each one must have 10 text samples.
- You can define up to 200 distinct tags. Each tag is a category that will be identified and extracted from the given text.
- Each sample of text data must have fewer than 5’000 characters.
- In our case we use the Case Description column with configured max size of 2’000 characters out-of-the-box.
- If you need to support more than 2’000 characters, you can create a new column of “Multiple line of text” – “Plain text” that support max size of 1’048’576 characters. Review the “Description Translated” column.
Create a category classification custom model
Now that you have your training data in Microsoft Dataverse, you can create a new model and configure it.
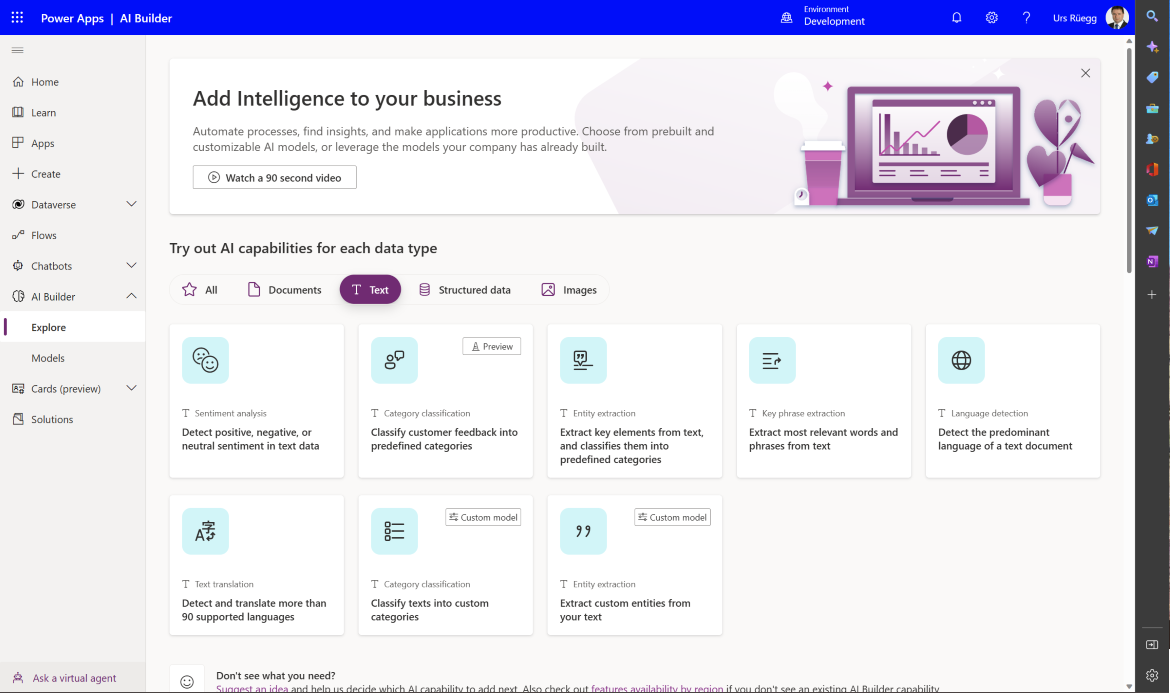
- Sign in to Power Apps (https://make.powerapps.com/) and then select AI Builder > Explores.
- Select Text.
- Select Category classification - Classify texts into custom categories.
- Read the Classify texts into custom categories page, and then select Get started.
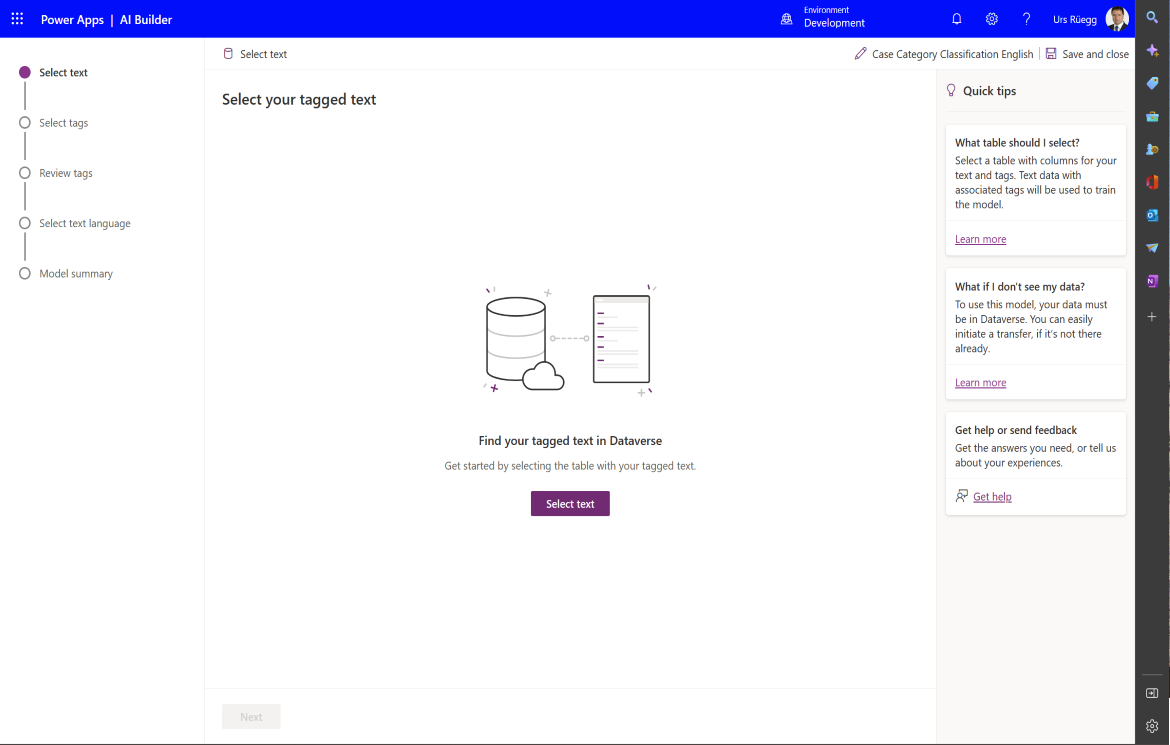
- The Category classification tile step by step window opens.
- Change the model name to “Case Category Classification English”
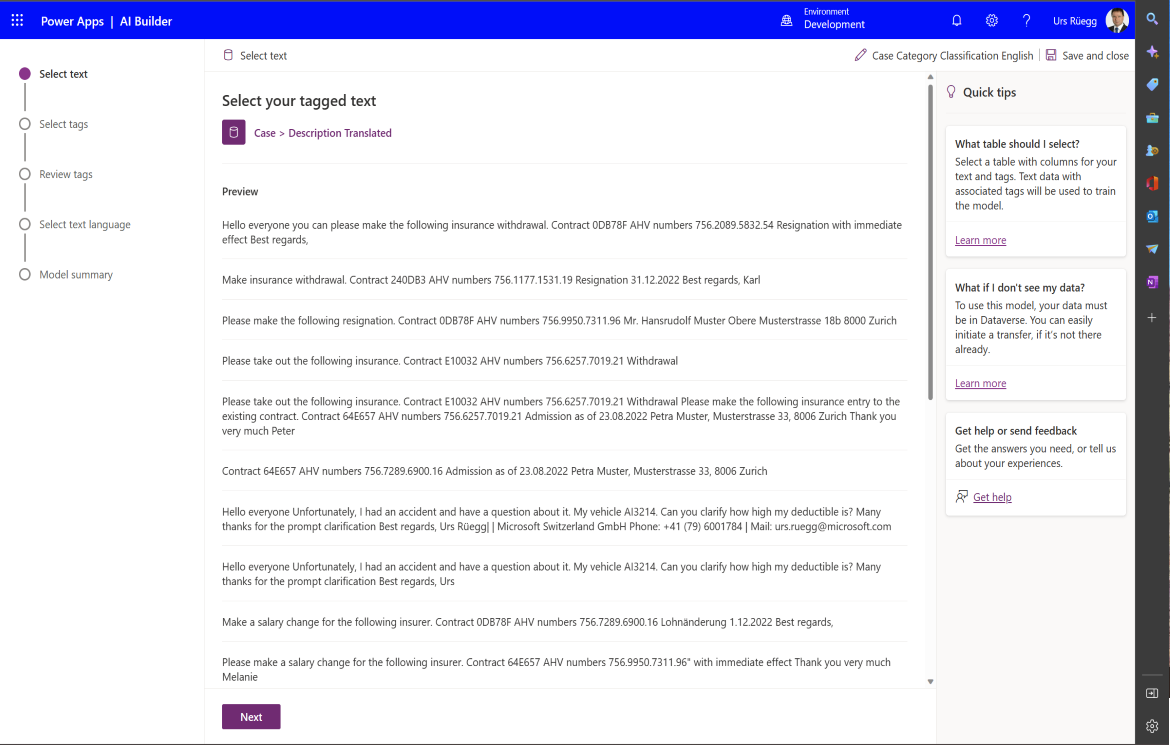
- Choose “Select text”, select the table “Case”, select the column “Description Translated” where your training text is stored, and then choose Select column.
- Select Next. See result
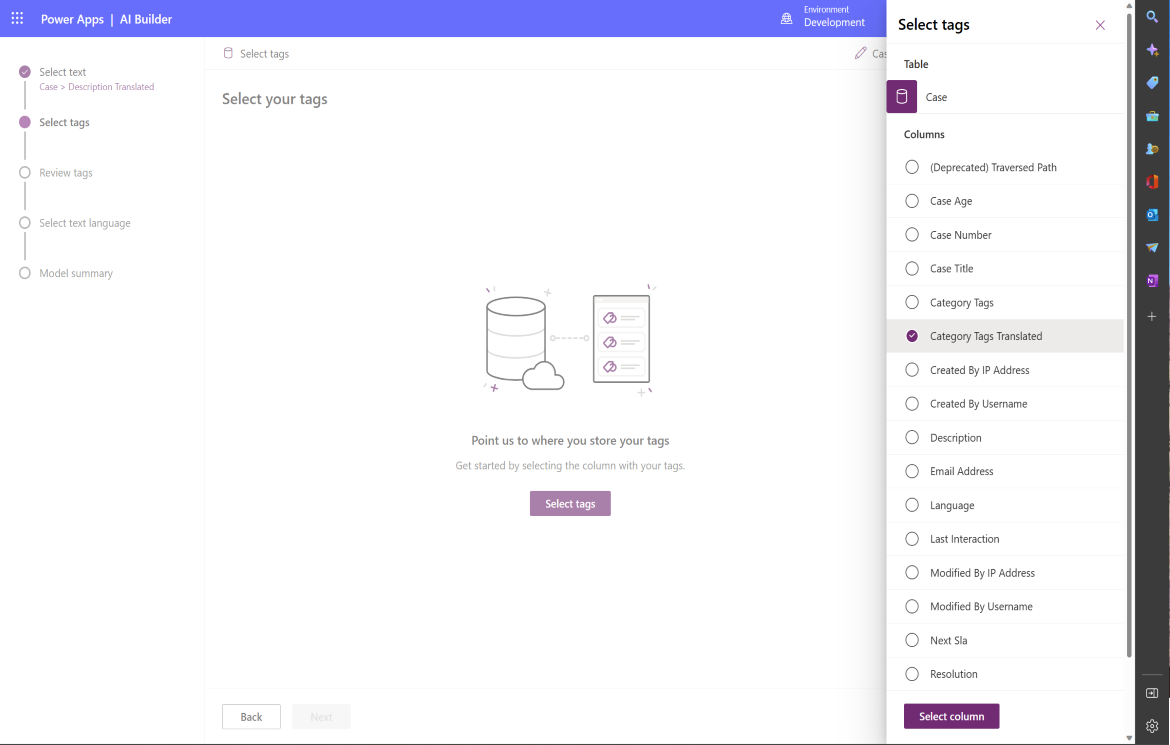
- Choose Select tags, select the column “Category Tags Translated” where the tags are stored, and then choose Select column.
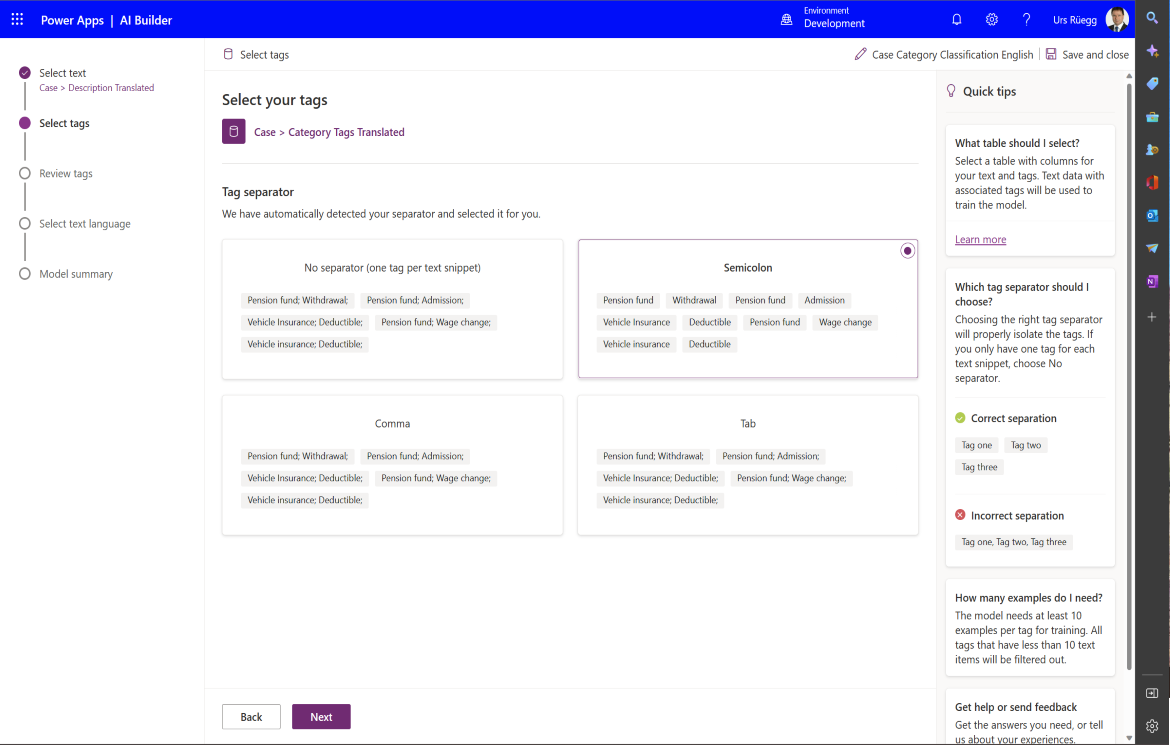
- (If not pre-selected) Select the separator you used for your tags, in our case “Semicolon” and then select Next.
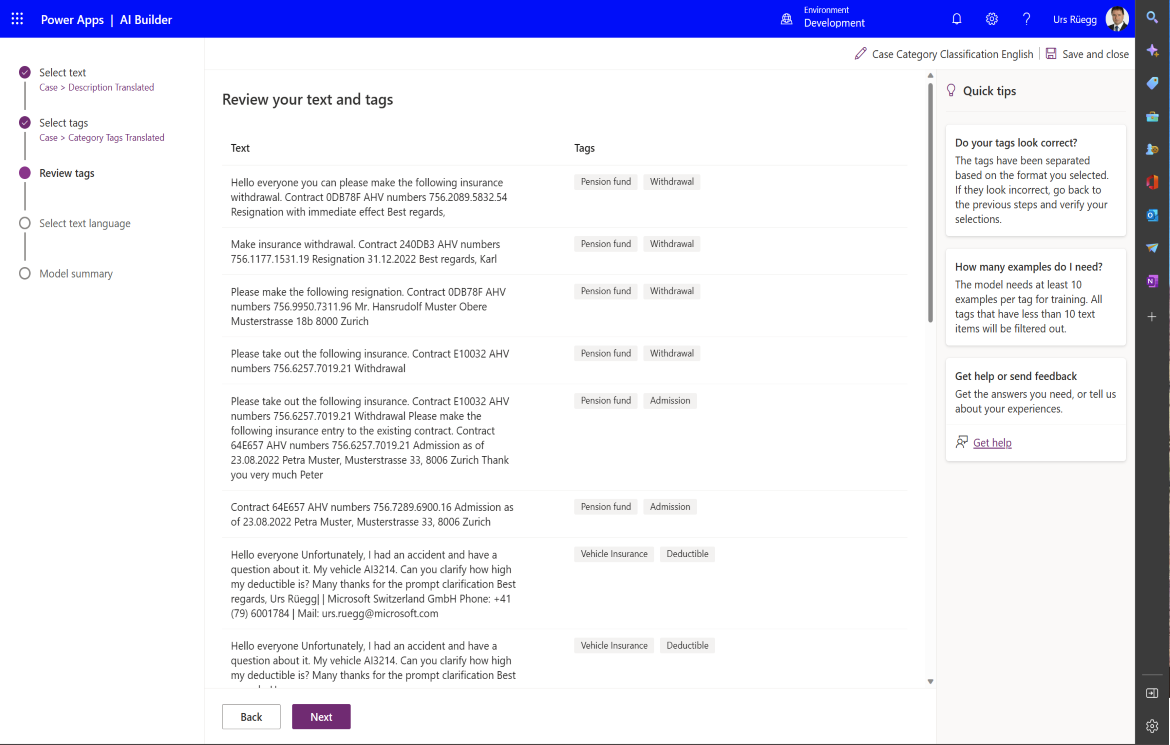
- Review your text and tags to verify the data and the configuration you applied, and then select Next.
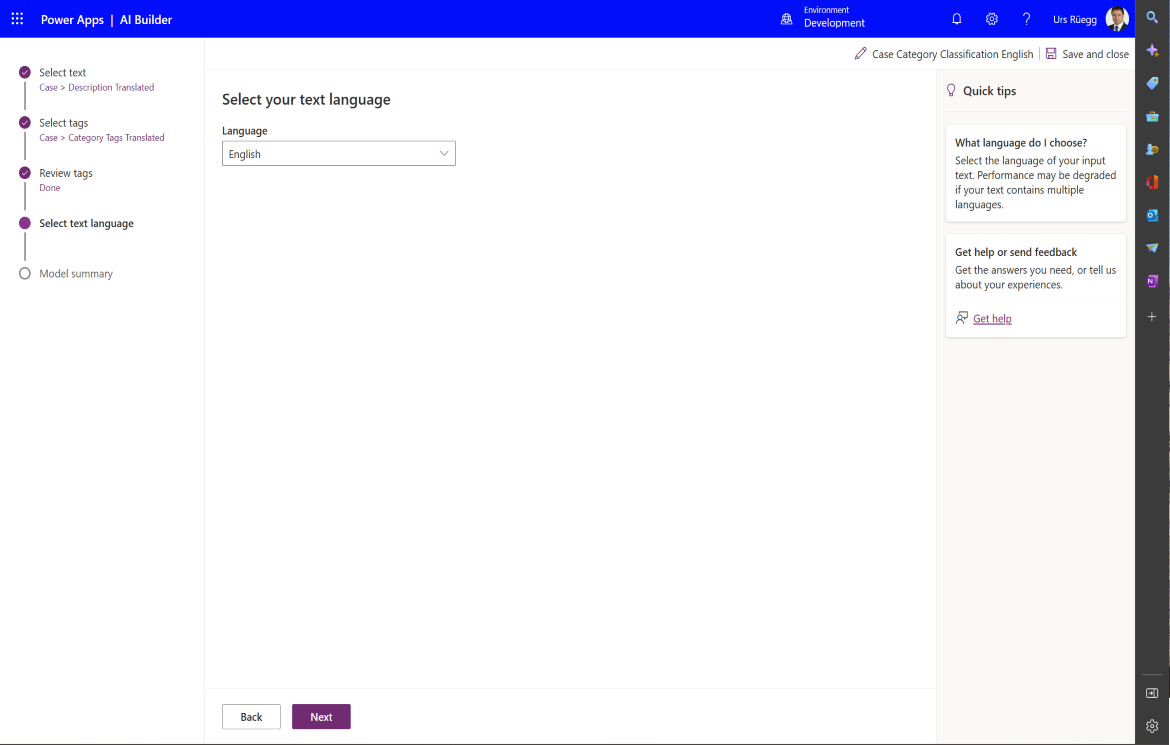
- Select the language “English” you want to use for training, and then select Next.
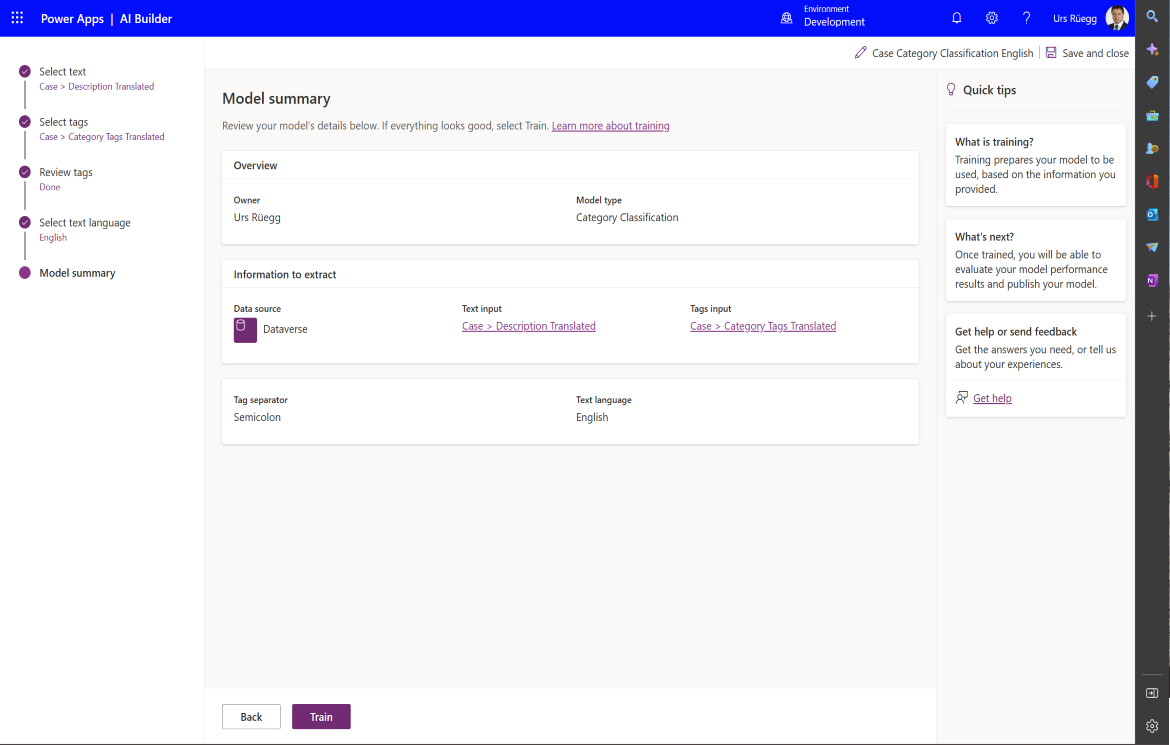
- To begin training your category classification model, review your configuration, and then select Train.
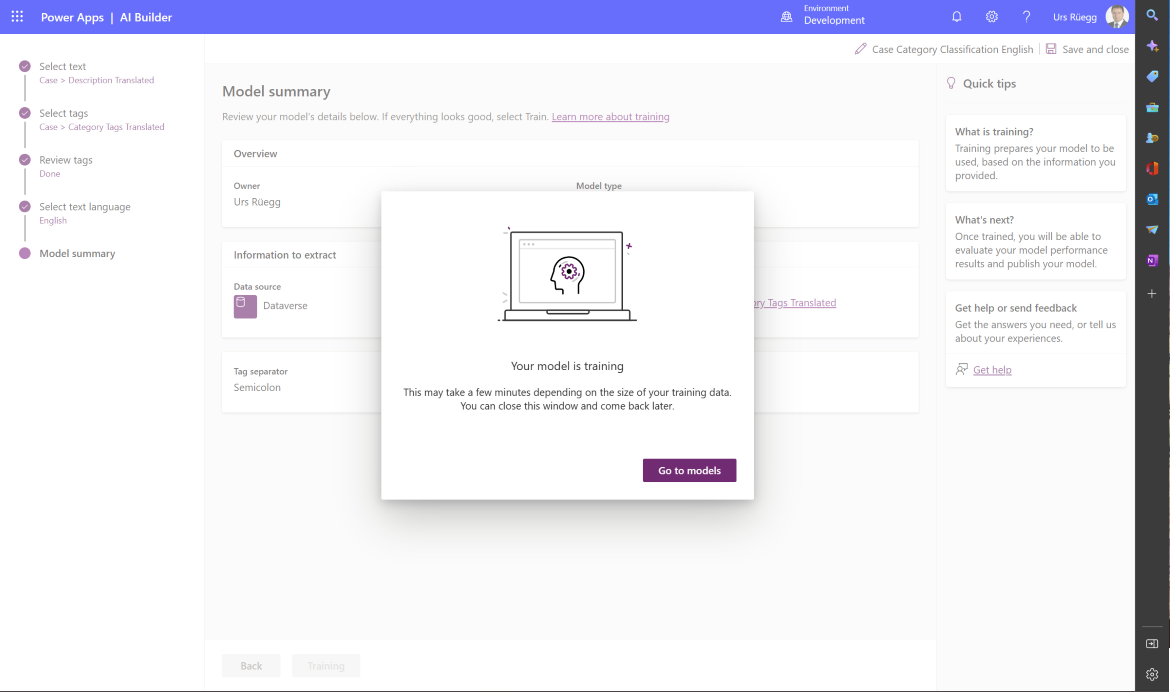
- When it's ready, you'll be notified.
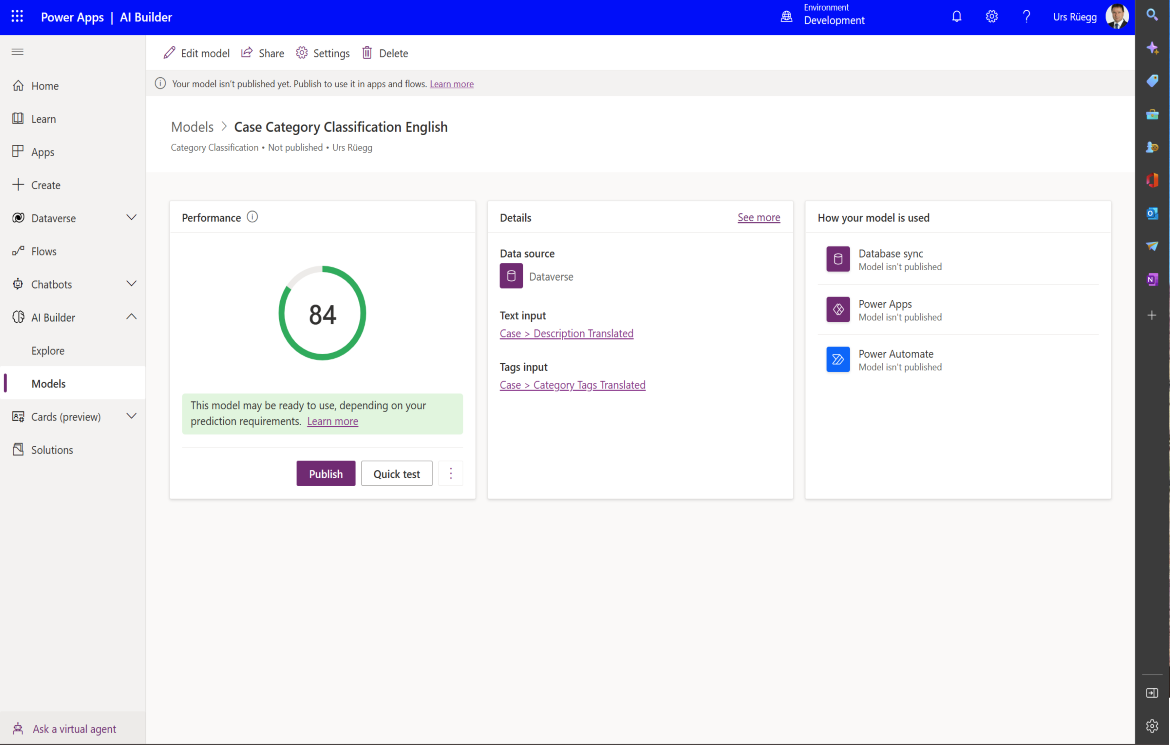
- After each training, AI Builder uses the test dataset to evaluate the quality and accuracy of your AI model. A summary page for your model shows your model training results, including a Performance score.
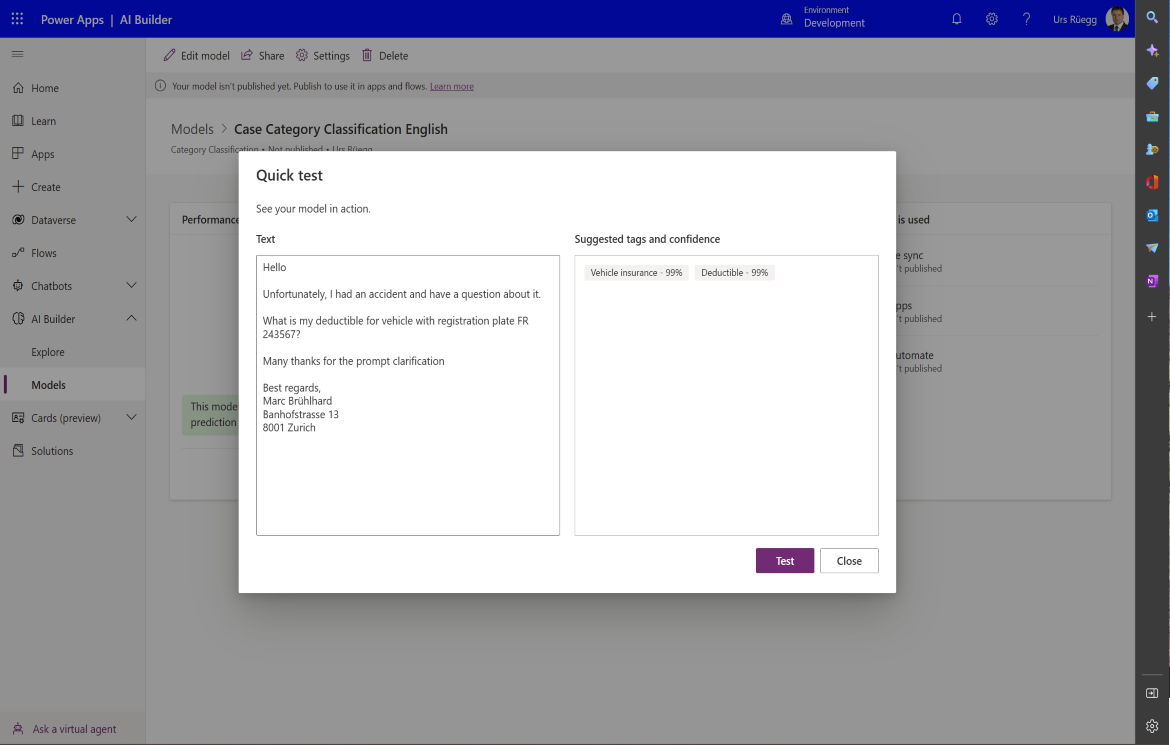
- You can also select Quick Test to assess the quality of the model. Just enter text that you want to tag.
- As a result you should get category tags with a confidence score
 Case
Management
AI Builder > Explores >
Select Text.
Case
Management
AI Builder > Explores >
Select Text.
 Case
Management
The Category
classification tile step by step window opens.
Case
Management
The Category
classification tile step by step window opens.
 Case
Management
Choose “Select text”,
select the table “Case”, select the column “Description
Translated” where your training text is stored, and then
choose Select column.
Case
Management
Choose “Select text”,
select the table “Case”, select the column “Description
Translated” where your training text is stored, and then
choose Select column.
 Case
Management
Select Next. See
result.
Case
Management
Select Next. See
result.
 Case
Management
Choose Select tags,
select the column “Category Tags Translated” where the tags
are stored, and then choose Select column.
Case
Management
Choose Select tags,
select the column “Category Tags Translated” where the tags
are stored, and then choose Select column.
 Case
Management
(If not pre-selected)
Select the separator you used for your tags, in our case
“Semicolon” and then select Next.
Case
Management
(If not pre-selected)
Select the separator you used for your tags, in our case
“Semicolon” and then select Next.
 Case
Management
Review your text and
tags to verify the data and the configuration you applied,
and then select Next.
Case
Management
Review your text and
tags to verify the data and the configuration you applied,
and then select Next.
 Case
Management
Select the language
“English” you want to use for training, and then select
Next.
Case
Management
Select the language
“English” you want to use for training, and then select
Next.
 Case
Management
To begin training your
category classification model, review your configuration,
and then select Train.
Case
Management
To begin training your
category classification model, review your configuration,
and then select Train.
 Case
Management
When it's ready, you'll
be notified.
Case
Management
When it's ready, you'll
be notified.
 Case
Management
After each training, AI
Builder uses the test dataset to evaluate the quality and
accuracy of your AI model. A summary page for your model
shows your model training results, including a Performance
score.
Case
Management
After each training, AI
Builder uses the test dataset to evaluate the quality and
accuracy of your AI model. A summary page for your model
shows your model training results, including a Performance
score.
 Case
Management
As a result you should
get category tags with a confidence score.
Case
Management
As a result you should
get category tags with a confidence score.
That's it! Now you have the first trained AI model.
Now we need to establish for each supported language a dedicated Category Classification model. In our case we want to support English, French and French.
Steps by step guide
- Create a solution “Case Management”
- Create a Automatically create Case records from Email ruleset
- Create instant flow “TranslateCasesToTargetLanguage”
- AI Builder category classification custom model
- Extend Automatically create Case flow with AI Builder models
- Configure Unified Routing based on Category Tags to Agents
6. Jan 2023